Hướng dẫn thêm chức năng Upload Image cho TinyMCE
TinyMCE là một nền tảng độc lập dựa trên Javascript HTML WYSIWYG được phát hành bởi LGPL web. Nó cung cấp một trình soạn thảo văn bản HTML, được thiết kế để đơn giản hóa việc tạo ra nội dung web. Nó giúp chúng ta dễ dàng chỉnh sửa định dạng những đoạn văn bản như blog, description… Hơn nữa nó cũng hoàn toàn miễn phí @hoangken trên viblo.asia

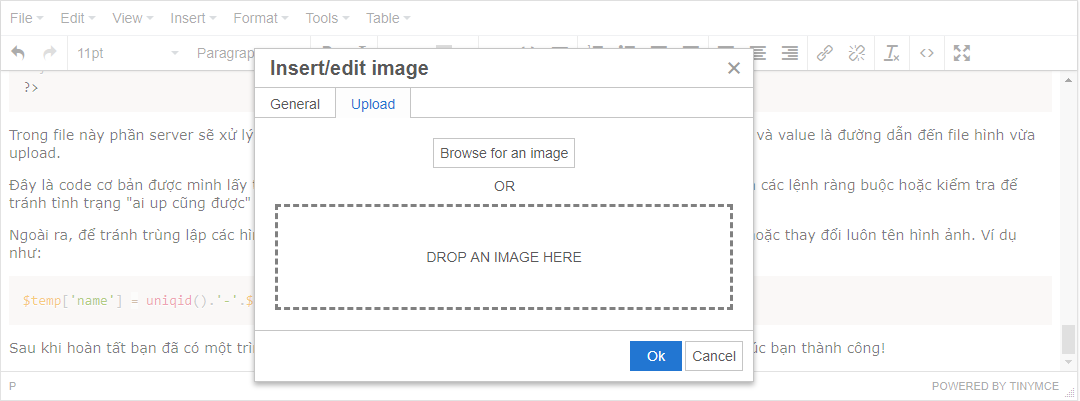
Trong bài viết này mình sẽ hướng dẫn các bạn xây dựng một trình soạn thảo tinymce có tích hợp upload image lên server, việc này giúp các admin tiết kiệm rất nhiều thời gian thay vì sử dụng công cụ upload khác phải mở qua lại. Khi hoàn tất các bạn có thể thêm ảnh ngay trên trình soạn thảo TinyMCE luôn. Lết gô …
Để sử dụng TinyMCE điều đầu tiên các bạn phải vào trang chủ đăng kí một tài khoản để include js của tiny trực tiếp vào web hoặc tải về local thông qua bower
bower install tinymceKhởi tạo trình soạn thảo với chức năng upload ảnh có sẵn của tinymce
tinymce.init({
  selector: 'textarea',  // change this value according to your html
  images_upload_url: 'imageUpload.php',
  automatic_uploads: true
});
Code này sử dụng chức năng upload có sẵn của Tiny chưa bao gồm các hình thức kiểm tra lỗi khi phát sinh phía xử lý của php. Nếu bạn muốn tự xử lý quá trình upload và kiểm lỗi thì hãy xử dụng code này
tinymce.init({
  selector: 'textarea',  // change this value according to your HTML
  images_upload_handler: function (blobInfo, success, failure) {
    var xhr, formData;

    xhr = new XMLHttpRequest();
    xhr.withCredentials = false;
    xhr.open('POST', 'imageUpload.php');

    xhr.onload = function() {
      var json;

      if (xhr.status != 200) {
        failure('HTTP Error: ' + xhr.status);
        return;
      }

      json = JSON.parse(xhr.responseText);

      if (!json || typeof json.location != 'string') {
        failure('Invalid JSON: ' + xhr.responseText);
        return;
      }

      success(json.location);
    };

    formData = new FormData();
    formData.append('file', blobInfo.blob(), blobInfo.filename());

    xhr.send(formData);
  }
});
Tạo một file imageUpload.php chứa code xử lý và lưu trữ hình ảnh.
<?php
  /***************************************************
   * Only these origins are allowed to upload images *
   ***************************************************/
  $accepted_origins = array("http://localhost", "http://192.168.1.1", "http://example.com");

  /*********************************************
   * Change this line to set the upload folder *
   *********************************************/
  $imageFolder = "images/";

  if (isset($_SERVER['HTTP_ORIGIN'])) {
    // same-origin requests won't set an origin. If the origin is set, it must be valid.
    if (in_array($_SERVER['HTTP_ORIGIN'], $accepted_origins)) {
      header('Access-Control-Allow-Origin: ' . $_SERVER['HTTP_ORIGIN']);
    } else {
      header("HTTP/1.1 403 Origin Denied");
      return;
    }
  }

  // Don't attempt to process the upload on an OPTIONS request
  if ($_SERVER['REQUEST_METHOD'] == 'OPTIONS') {
    header("Access-Control-Allow-Methods: POST, OPTIONS");
    return;
  }

  reset ($_FILES);
  $temp = current($_FILES);
  if (is_uploaded_file($temp['tmp_name'])){
    /*
      If your script needs to receive cookies, set images_upload_credentials : true in
      the configuration and enable the following two headers.
    */
    // header('Access-Control-Allow-Credentials: true');
    // header('P3P: CP="There is no P3P policy."');

    // Sanitize input
    if (preg_match("/([^\w\s\d\-_~,;:\[\]\(\).])|([\.]{2,})/", $temp['name'])) {
        header("HTTP/1.1 400 Invalid file name.");
        return;
    }

    // Verify extension
    if (!in_array(strtolower(pathinfo($temp['name'], PATHINFO_EXTENSION)), array("gif", "jpg", "png"))) {
        header("HTTP/1.1 400 Invalid extension.");
        return;
    }

    // Accept upload if there was no origin, or if it is an accepted origin
    $filetowrite = $imageFolder . $temp['name'];
    move_uploaded_file($temp['tmp_name'], $filetowrite);

    // Determine the base URL
    $protocol = isset($_SERVER['HTTPS']) && $_SERVER['HTTPS'] == 'on' ? "https://" : "http://";
    $baseurl = $protocol . $_SERVER["HTTP_HOST"] . rtrim(dirname($_SERVER['REQUEST_URI']), "/") . "/";

    // Respond to the successful upload with JSON.
    // Use a location key to specify the path to the saved image resource.
    // { location : '/your/uploaded/image/file'}
    echo json_encode(array('location' => $baseurl . $filetowrite));
  } else {
    // Notify editor that the upload failed
    header("HTTP/1.1 500 Server Error");
  }
?>
Trong file này phần server sẽ xử lý hình ảnh upload lên và trả về kết quả ở dạng JSON với key là location và value là đường dẫn đến file hình vừa upload.
Đây là code cơ bản được mình lấy từ TinyMCE Docs để làm ví dụ, để bảo mật hơn thì các bạn có thể thêm các lệnh ràng buộc hoặc kiểm tra để tránh tình trạng “ai up cũng được” gây nặng server của mình.
Ngoài ra, để tránh trùng lập các hình ảnh sau này, các bạn có thể thêm uniqid() vào trước tên của ảnh hoặc thay đổi luôn tên hình ảnh. Ví dụ như:
$temp['name'] = uniqid().'-'.$temp['name'];Sau khi hoàn tất bạn đã có một trình soạn thảo với chức năng upload ảnh như của mình trên rồi. Chúc bạn thành công!


